Saner Network Scanner allows the agentless discovery and assessment of IP-enabled devices throughout your organization without the need for additional hardware. The scanner utilizes the existing endpoints in your network to conduct scans that identify vulnerabilities, misconfigurations, and exposed services. By employing scan policies and tasks, you can perform scans on a scheduled basis or on demand, including authenticated scans for deeper visibility. This provides you with actionable insights into your network security posture.
The Network Scanner page is structured with the following key menus to streamline the configuration and management of scanning operations:
- Home
Provides an overview of scan tasks, scanner status, and recent activity, along with quick actions. - Scanners
Add and manage network scanners, designate devices as global scanners for use across multiple organizations, sites, or accounts. - Scan Credentials
Manage authentication credentials (SSH, SMB, HTTP/HTTPS) used for authenticated scanning. - Scan Policy
Create and manage scan policies that define what to scan and how scans get executed. - Logs
View detailed records of scan activities for auditing and troubleshooting. - Create New Task
Start a new scan task using a guided multi-step process.
Provides a centralized view of all scan tasks, including task name, targets, applied policies, scanner status, and available actions.
All the configured scan tasks display in the table, where you can:
- Click Run Scan to start a scan immediately
- Click Download to retrieve available scan results
- Use More Options (⋯) to edit or delete a task
- View the Progress Bar to track scan execution status
Access additional configuration and management options using the menu links at the top of the page.
The following table explains the purpose and usage of each icon in the Designated Network Scanner section.
| Icons | Description |
|---|---|
| Starts the Network Scan. If this icon is disabled, understand that the device is either shut down or the Saner Agent on the device is inactive. | |
| Aborts the ongoing Network Scan. | |
| Indicates that the Saner Agent on the designated network scanner is active. | |
| Indicates an inactive Saner Agent on the designated network scanner. | |
| Indicates that the Network Scanner is active and scanning. | |
| Indicates that the last Network Scan was aborted. | |
| Indicates that the Network Scanner is idle. | |
| Provides details of the last network scan. | |
| Deletes the Network Scanner. | |
| Downloads the last two network scan reports. However, deleting the designated Network Scanner deletes the reports as well. At the same time, re-designating the Network Scanner does not restore the old network scan reports. | |
| Indicates that the scanner has been assigned to other accounts and is functioning as a global scanner, making it accessible across multiple organizations and accounts. |
Follow these steps to configure and run network scans in your environment.
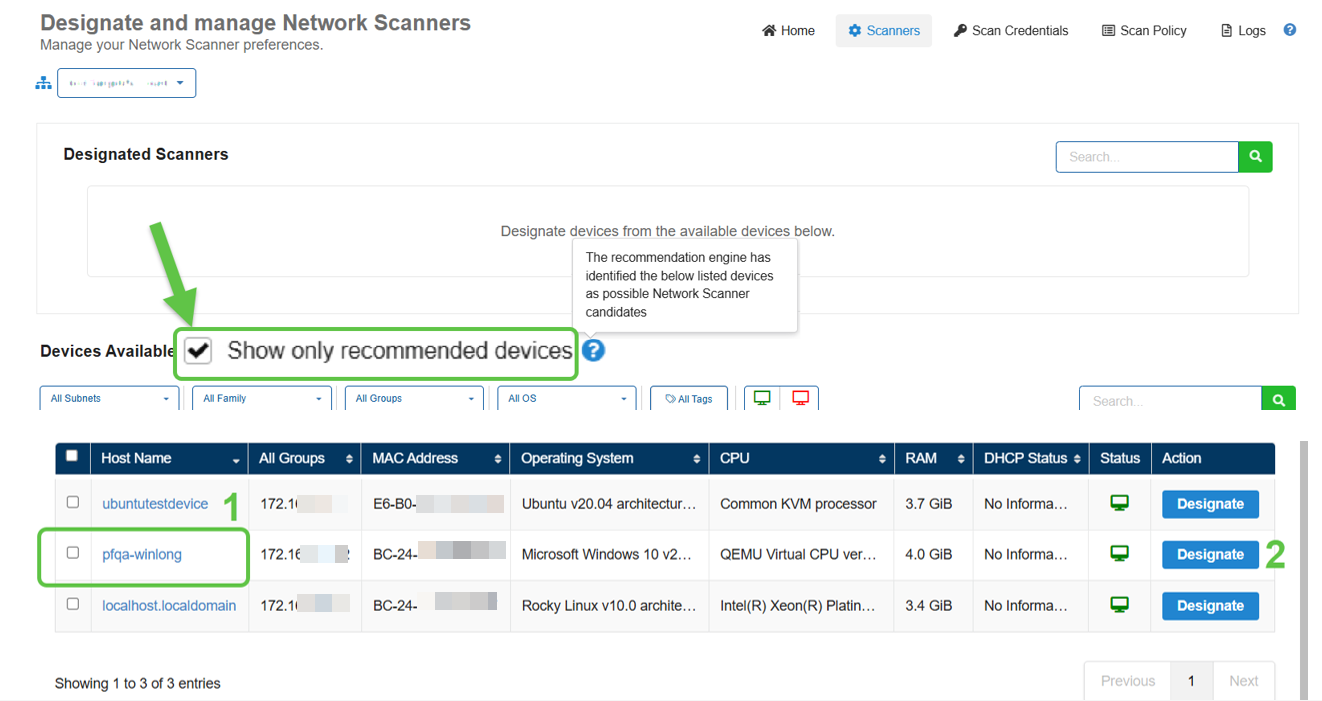
a. Designate devices as network scanners by either selecting from Saner's recommended device list or choosing your own from the available devices list.
Here's how to...
Select the Show only recommended devices checkbox to view devices suggested by Saner's recommendation engine for network scanning. From the filtered list, click Designate in the Actions column to assign a device as a Network Scanner.
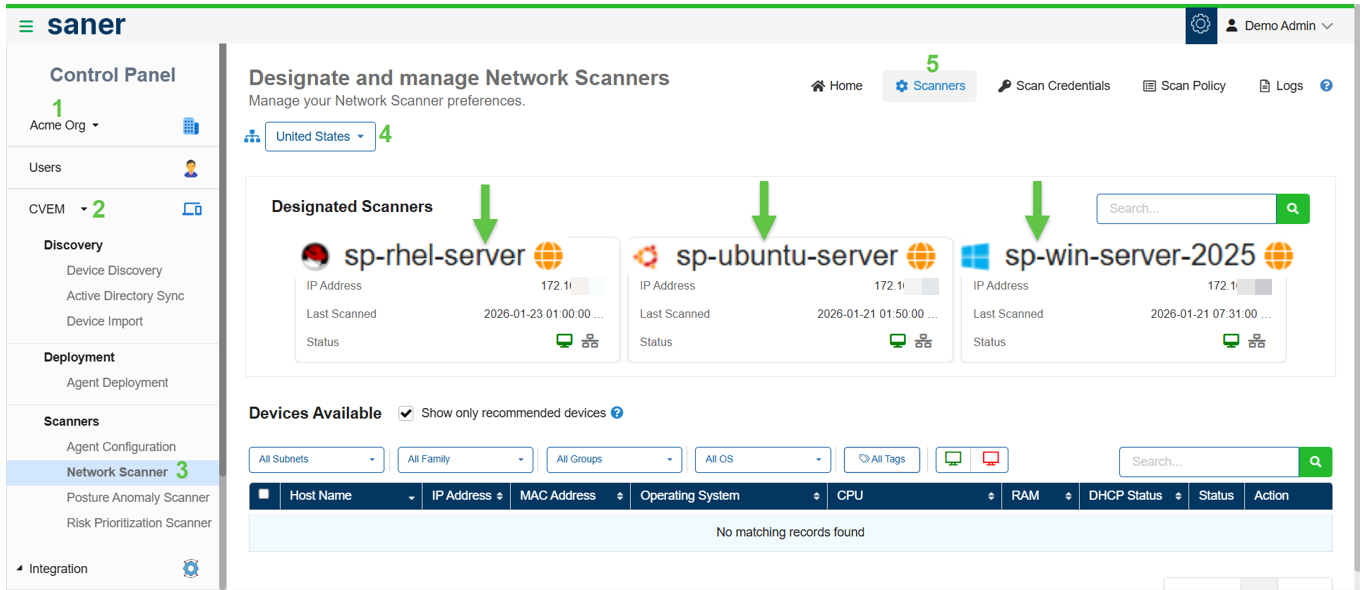
b. Optionally configure scanners as global scanners to make them accessible across multiple organizations, sites, or accounts.
Here's how to...
In the Designated Scanners section on the Network Scanner Tasks homepage, click the Edit icon for a scanner and select the option to designate it as a Global Scanner. In the pop-up window, choose if you want to apply the scanner to a specific account or make it available across an entire organization.
To verify the configuration, switch to the relevant organization from the Control Panel, navigate to the Designate and Manage Network Scanners page, and confirm that the scanner appears in the Designated Scanners section.
Scan credentials allow authenticated scanning for deeper and more accurate visibility.
Use Scan Credentials to:
- Add and manage credentials centrally
- Associate credentials during task creation
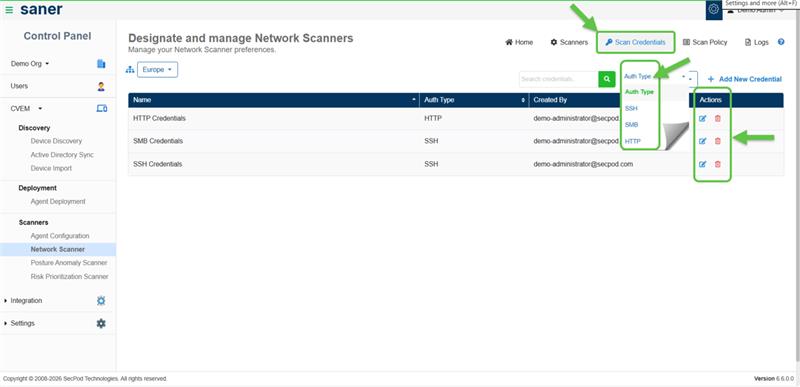
Supported credential types:
- SSH (Linux/Unix systems)
- SMB (Windows systems)
- HTTP/HTTPS
Note: Authenticated scans provide more accurate detection of vulnerabilities and misconfigurations.
How to Add and Manage Credentials?
Use the Add New Credential option at the top-right of the list view to configure new credentials. In the Add New Credential window, enter the required details to create a credential.
After creation, you can manage credentials directly from the list view. Use the Edit icon in the Actions column to modify a credential or select Delete to remove it.
Scan policies define what to scan and how the scan gets executed.
You have an option to:
- Use default policies (ready-to-use)
- Create custom policies based on your requirement
How to Create and Configure Scan Policies?
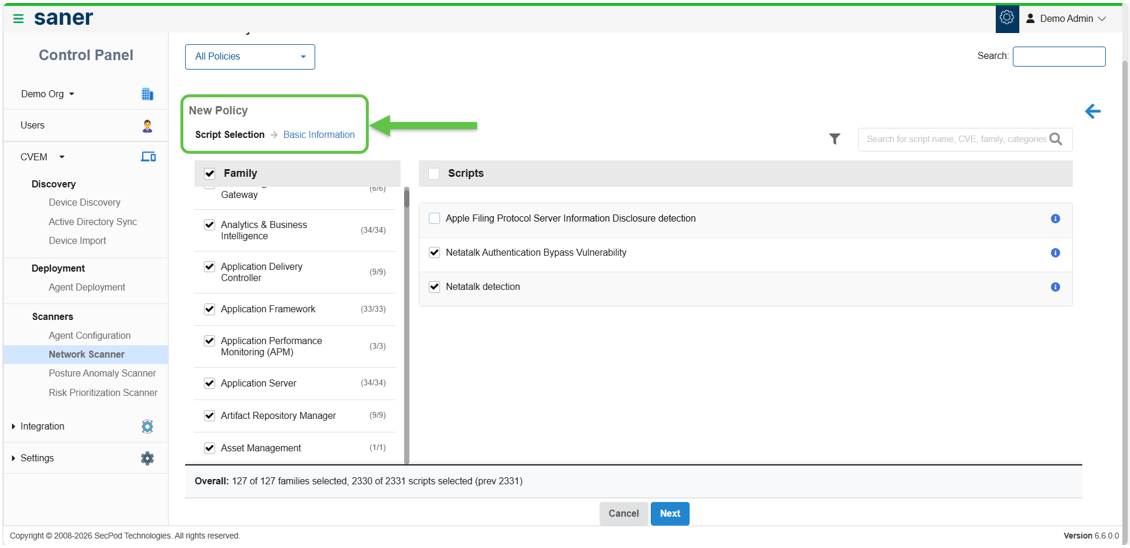
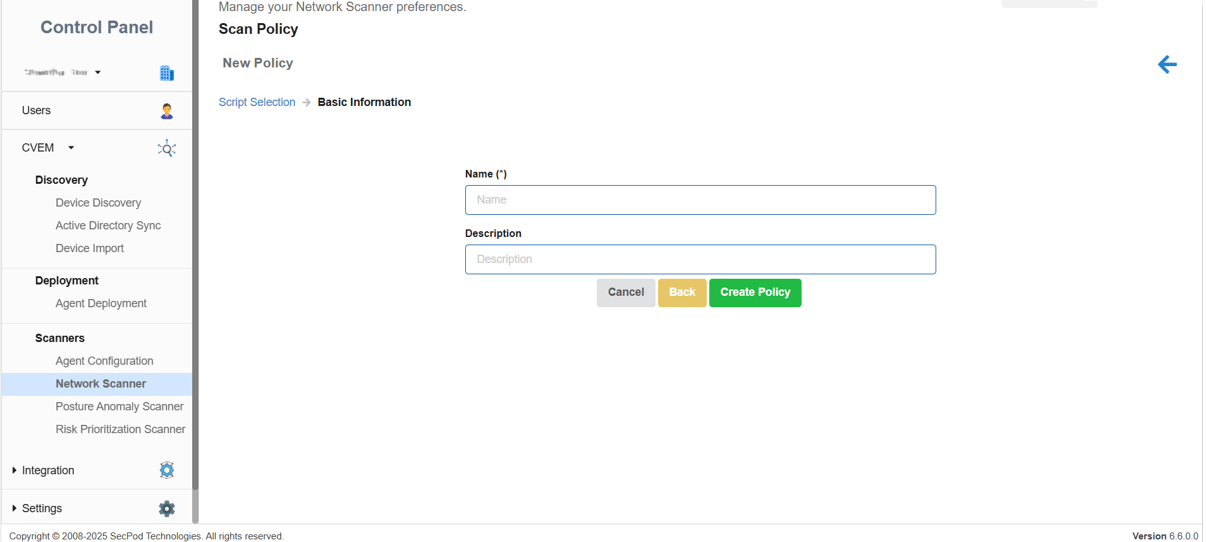
From the Scan Policy page, click New Policy to begin creating a scan policy. In the Script Selection screen, choose the required script families and their associated scripts based on your scanning needs.
You can also create a custom policy by providing a name and description, then clicking Create Policy to save the configuration.
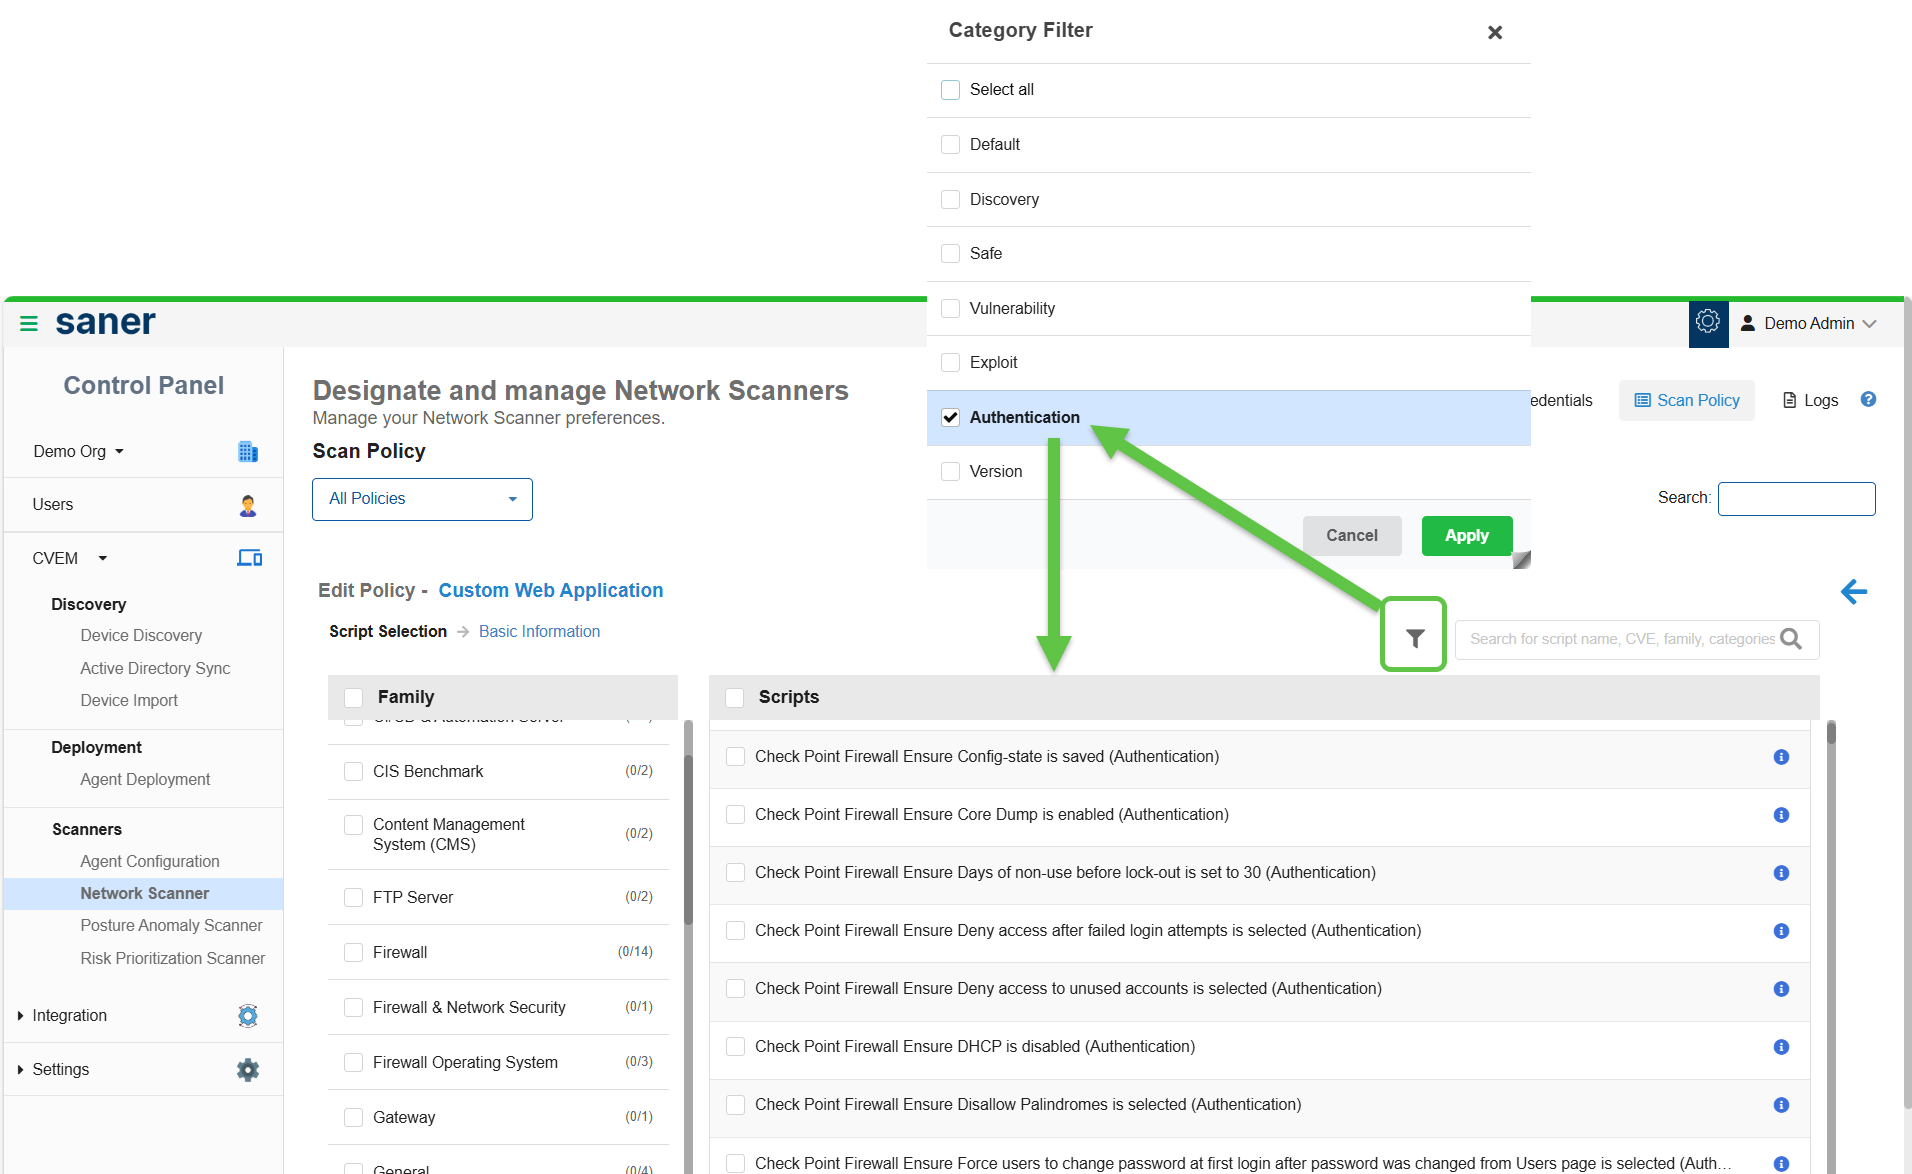
How to Use the Category Filter?
Use the Category Filter to narrow down scripts based on your scanning needs. Scripts are grouped into different categories. You have an option to select one or more categories and click Apply, review the list of scripts displayed for the selected categories, or deselect any scripts you do not want to include in the policy and click Apply.
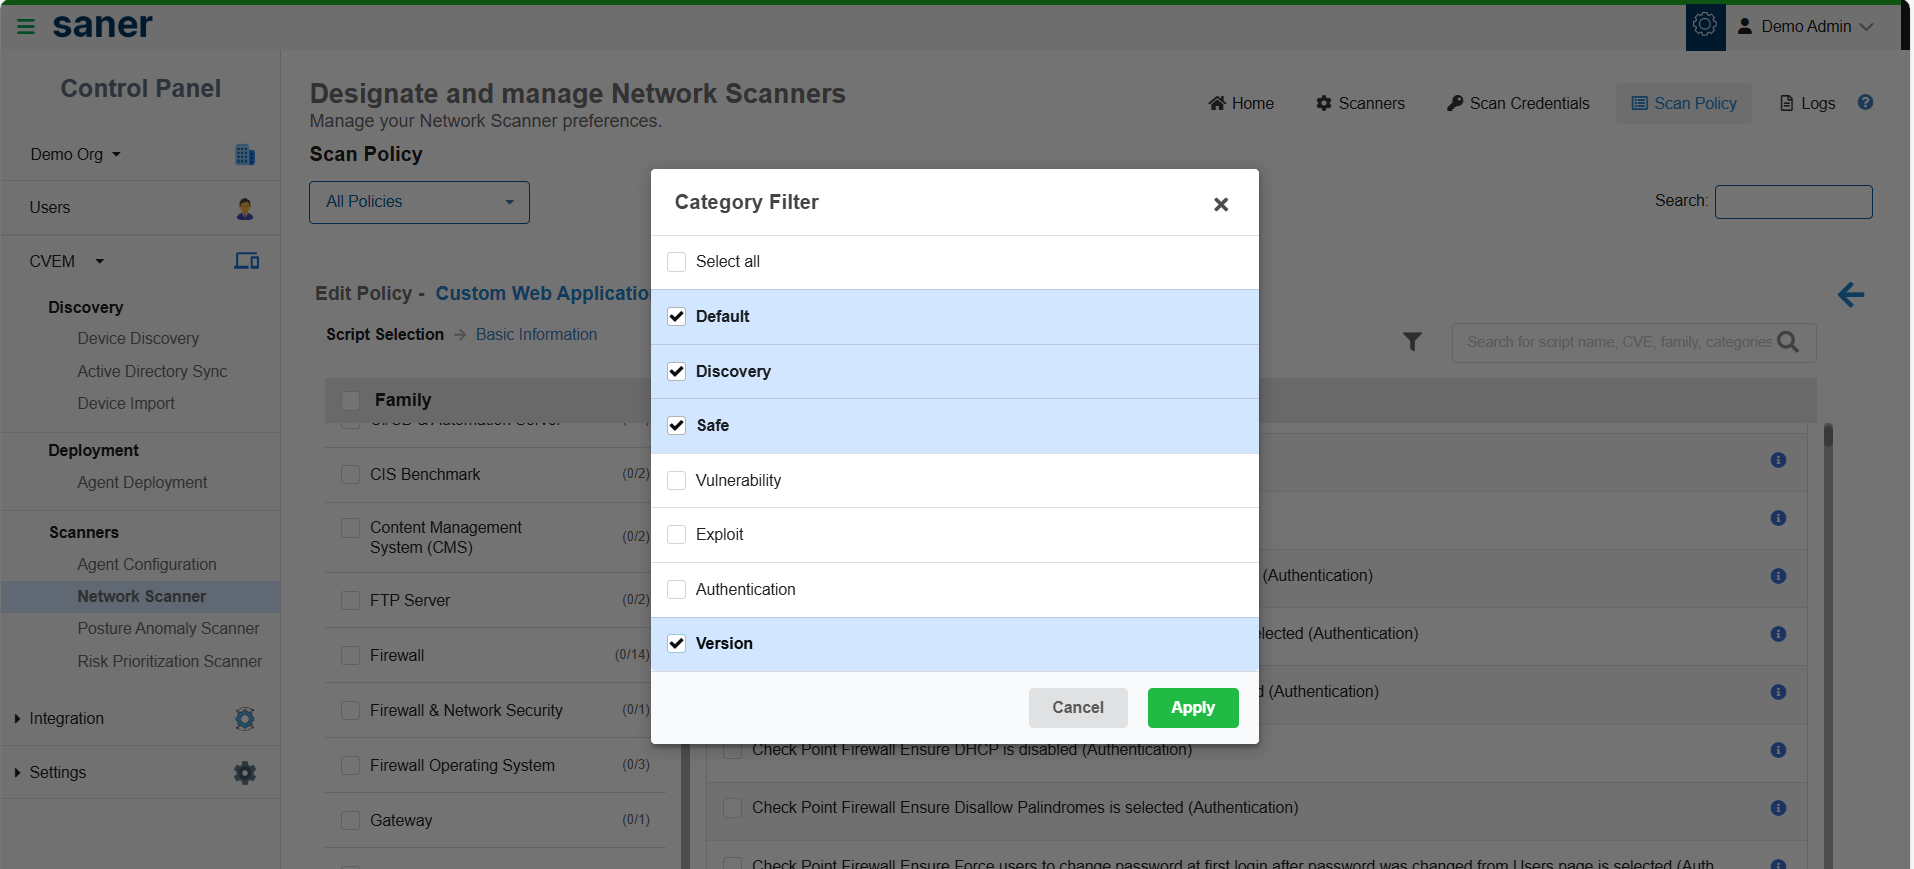
On selecting the Authentication option from the Category filter, all the scripts that support authentication display on the screen.

Scan tasks define what to scan, how to scan, and when to scan.
Before you begin, make sure to:
- Configure at least one scanner
- Check the availability of a scan policy prior to execution
Step A: Provide the Basic Details
- Enter the task name and description
- Select a scan policy
Step B: Define Targets
- Specify IP addresses or ranges (CIDR or range format)
- Optionally exclude specific IPs
Step C: Configure Scan Settings
- Select one or more scanners
- Choose scan type (TCP / TCP & UDP)
- Select ports (default or custom)
Multi-scanner Support:
- Assign multiple scanners to a single task
- Workload distributes automatically
- Improves performance and reduces scan time
Step D: [Optional] Configure Credentials
Select credentials for authenticated scans. This is required if the selected policy includes authenticated checks.
Step E: Schedule Execution
- Run on-demand or schedule scans: Daily, Weekly, or Monthly
- Configure timezone and execution window
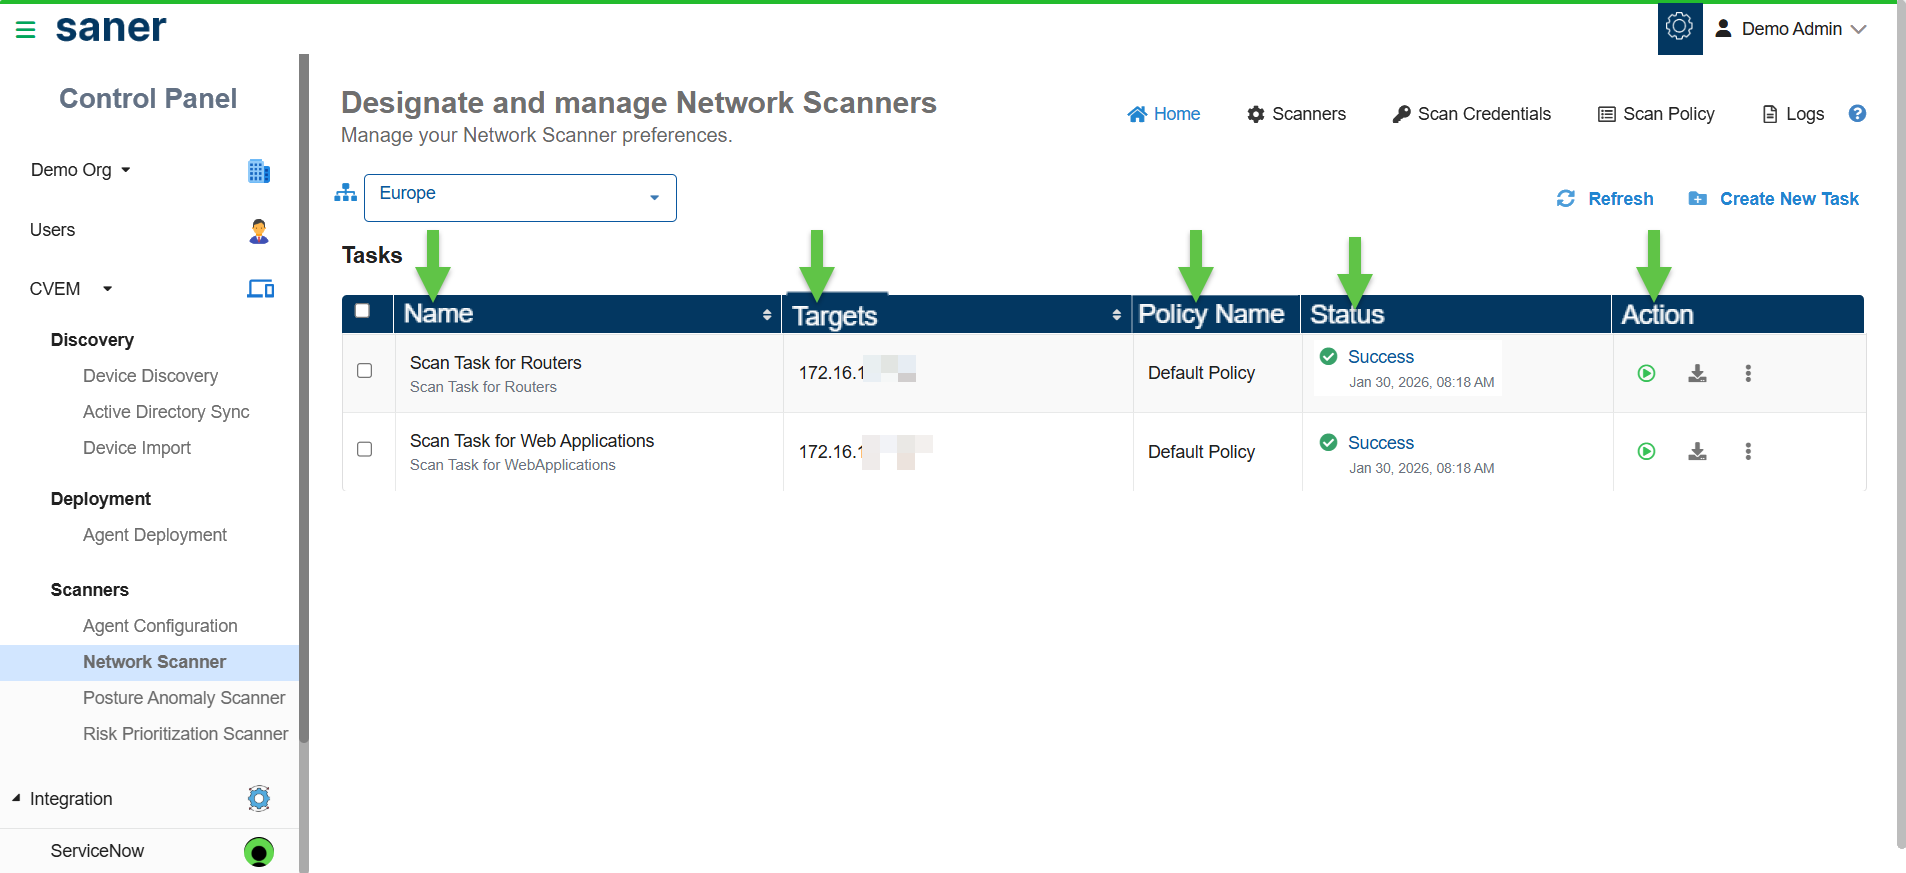
Scan results provide visibility into vulnerabilities, misconfigurations, and network exposure. The Network Scanner Homepage provides a centralized overview of all scanning tasks, displaying key details such as Task name, Targets, Applied policies, Scanner status, and Available actions.
Monitor Scan Status
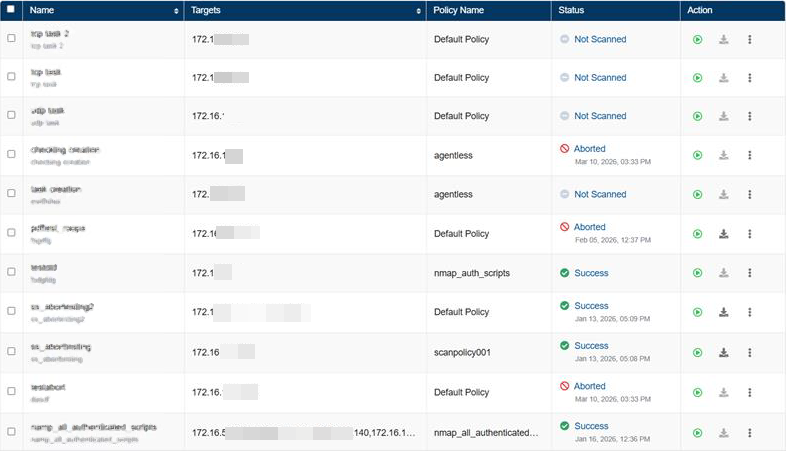
From the scan results view, interpret the different statuses of scan execution: Not Scanned, Ongoing, Success, Fail, and Aborted.
You can view results in:
- Device Details
- Vulnerabilities
- Misconfigurations
- Assets
- Ports and Services
- Cyber Hygiene Score (CHS)
From scan tasks, you can:
- Monitor scan status (Ongoing, Success, Aborted)
- Track progress and coverage
- Download scan reports
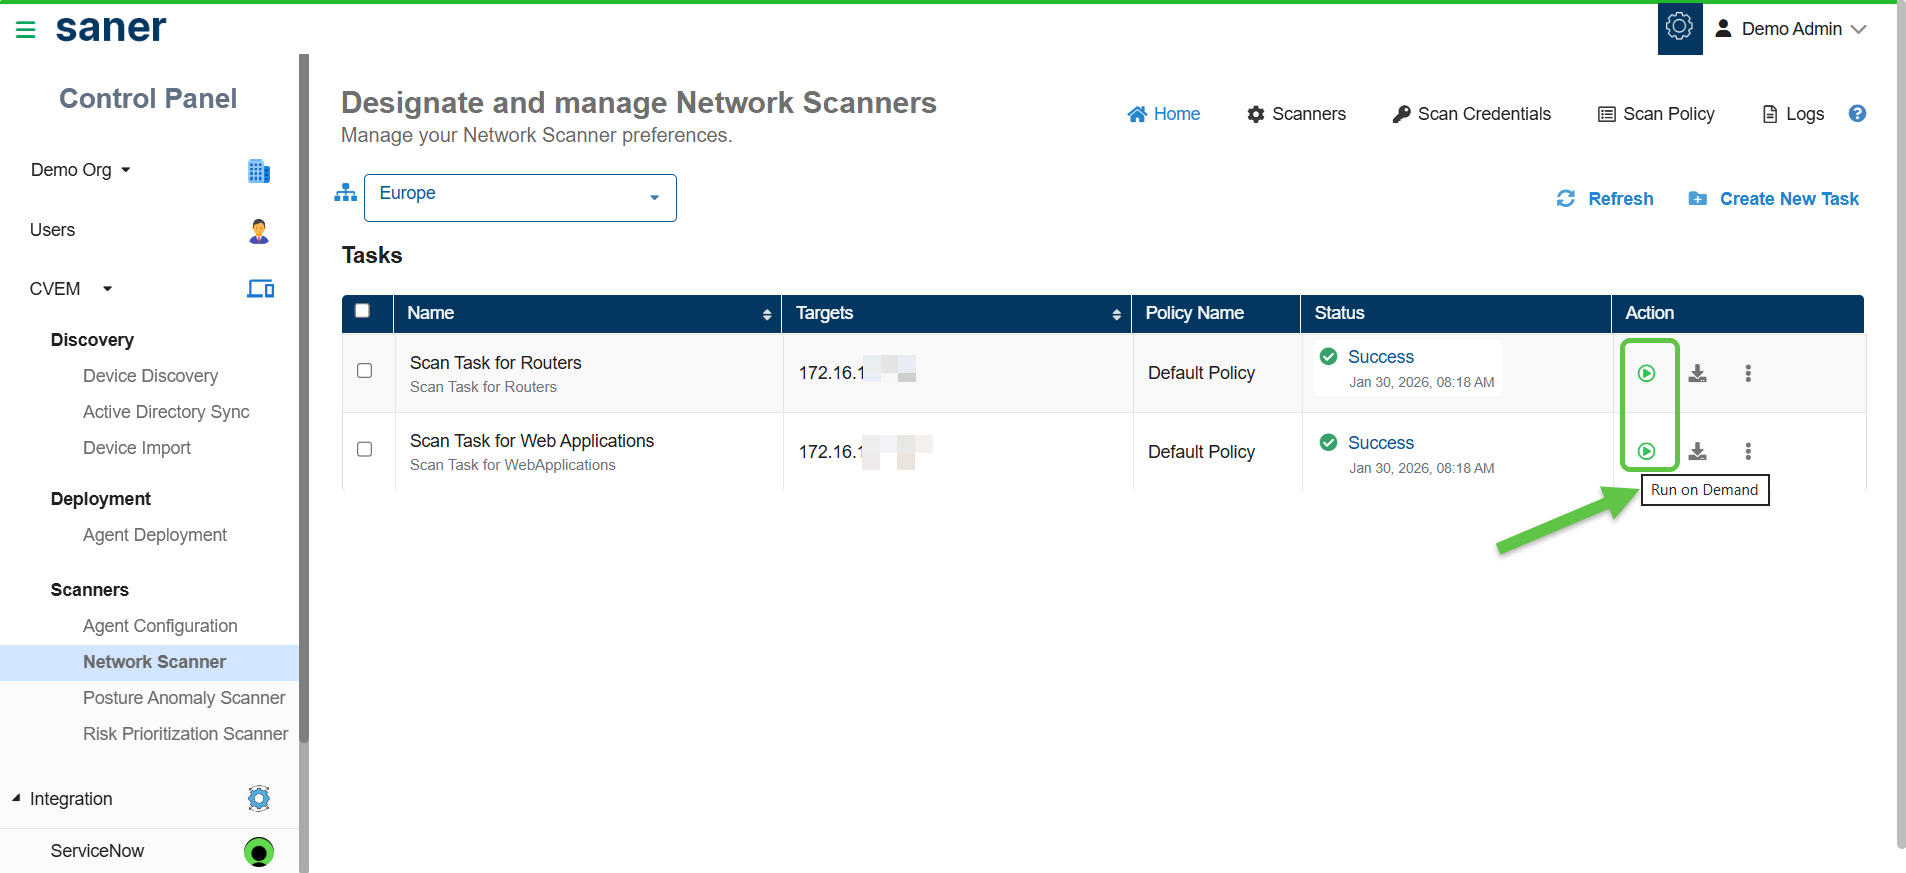
Run Scan Task
From the Designate and Manage Network Scanners page, click the Run on Demand (arrow with circle) button under the Action column for the corresponding network scan task.
Where to View the Scan Results?
Scan results provide visibility into vulnerabilities, misconfigurations, and network exposure. You can view results in Device Details, Vulnerabilities, Misconfigurations, Assets, Ports and Services, and Cyber Hygiene Score (CHS).
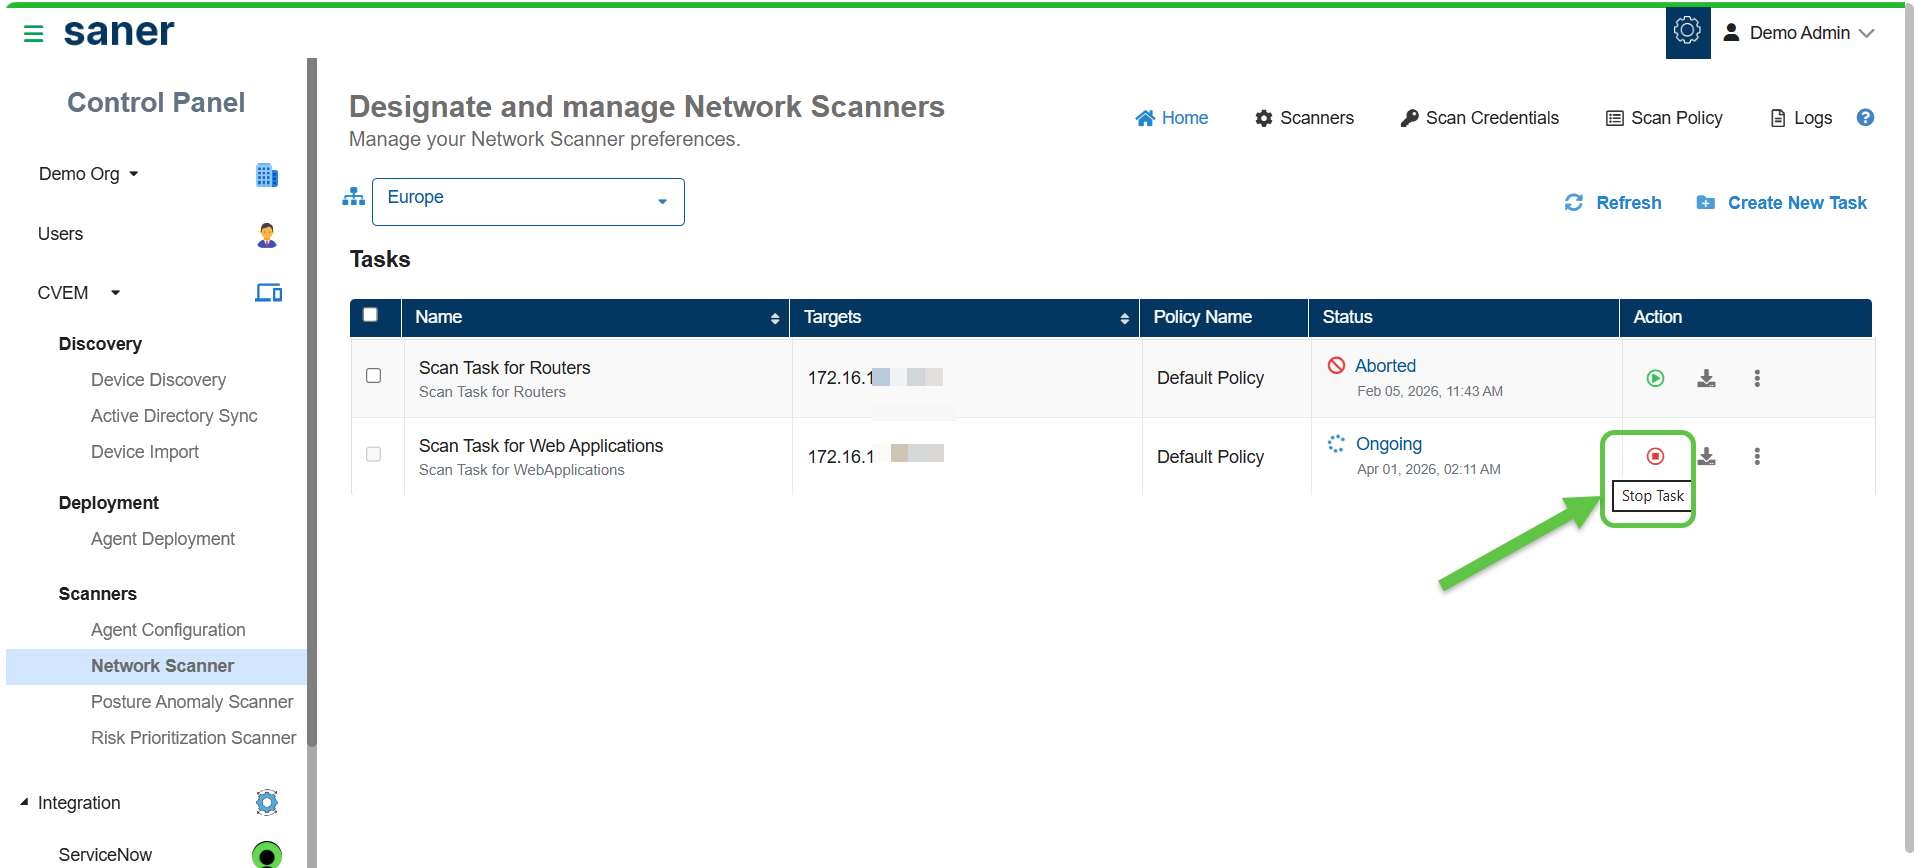
Abort and Restart a Scanner Task
Stop an ongoing scanner task by clicking the Stop Task button under the Actions column. The status of the task then changes to Aborted. If you want to restart the task, click the Run on Demand (arrow with circle) button once again.
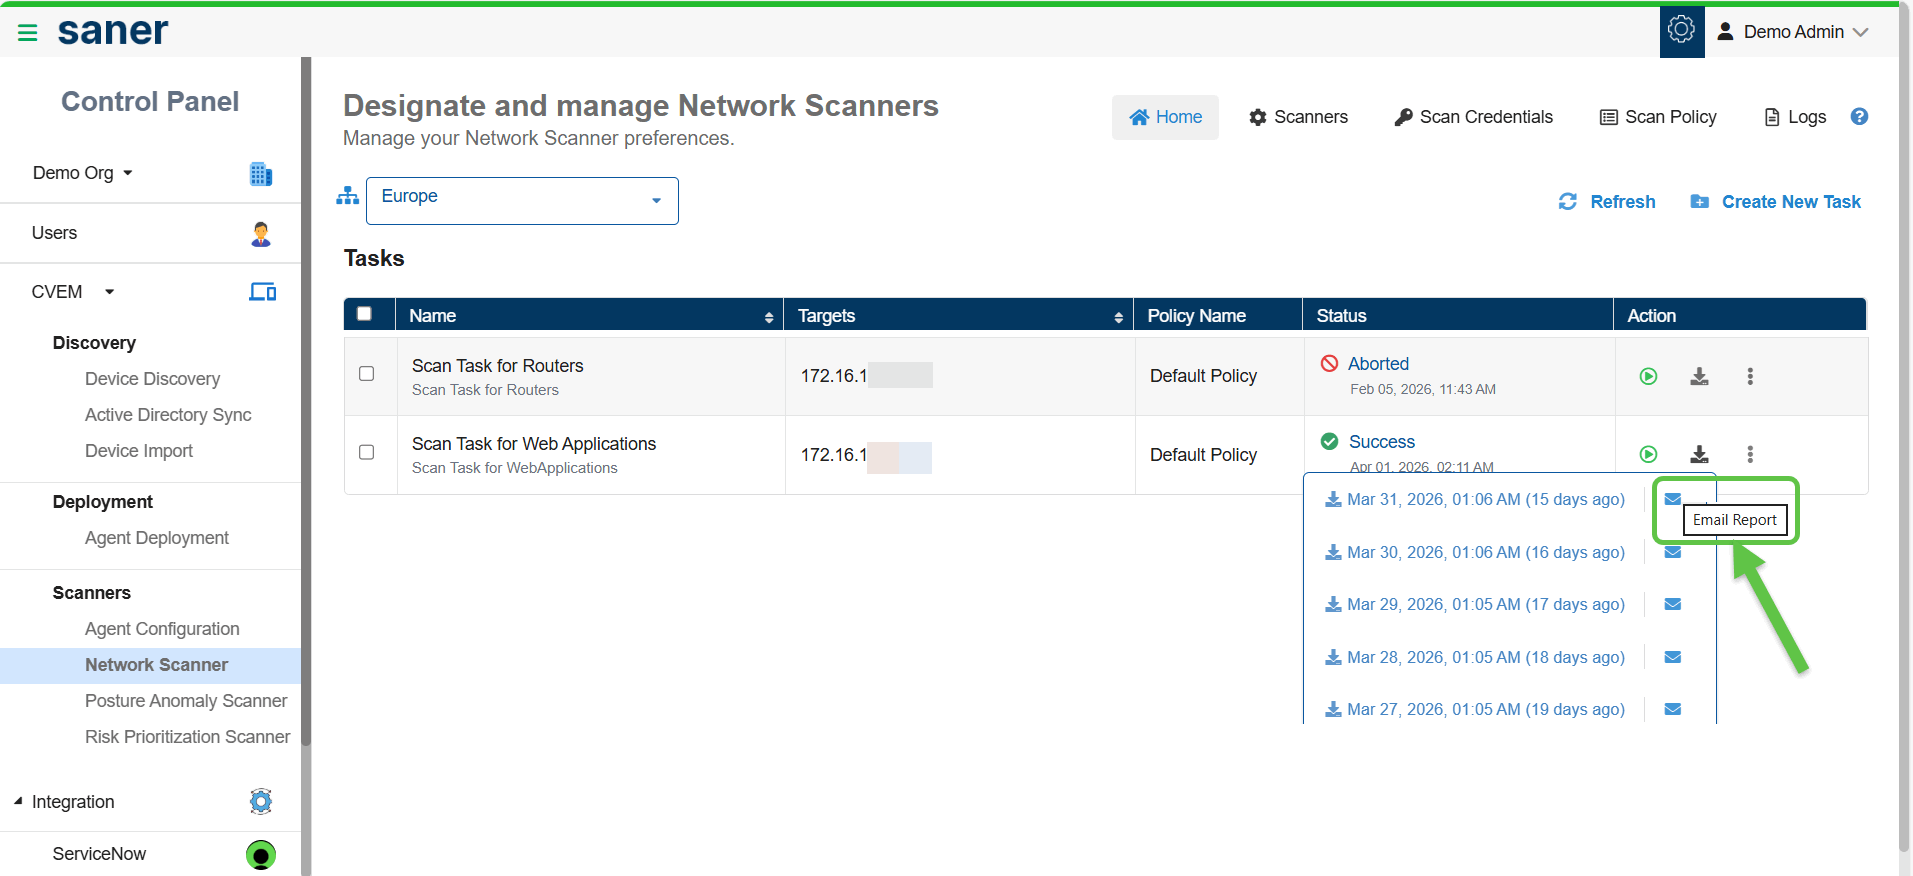
Download Scan Reports
From the Designate and Manage Network Scanners page, click the Download button under the Action column for the corresponding network scan task. This downloads the last five network scan reports.
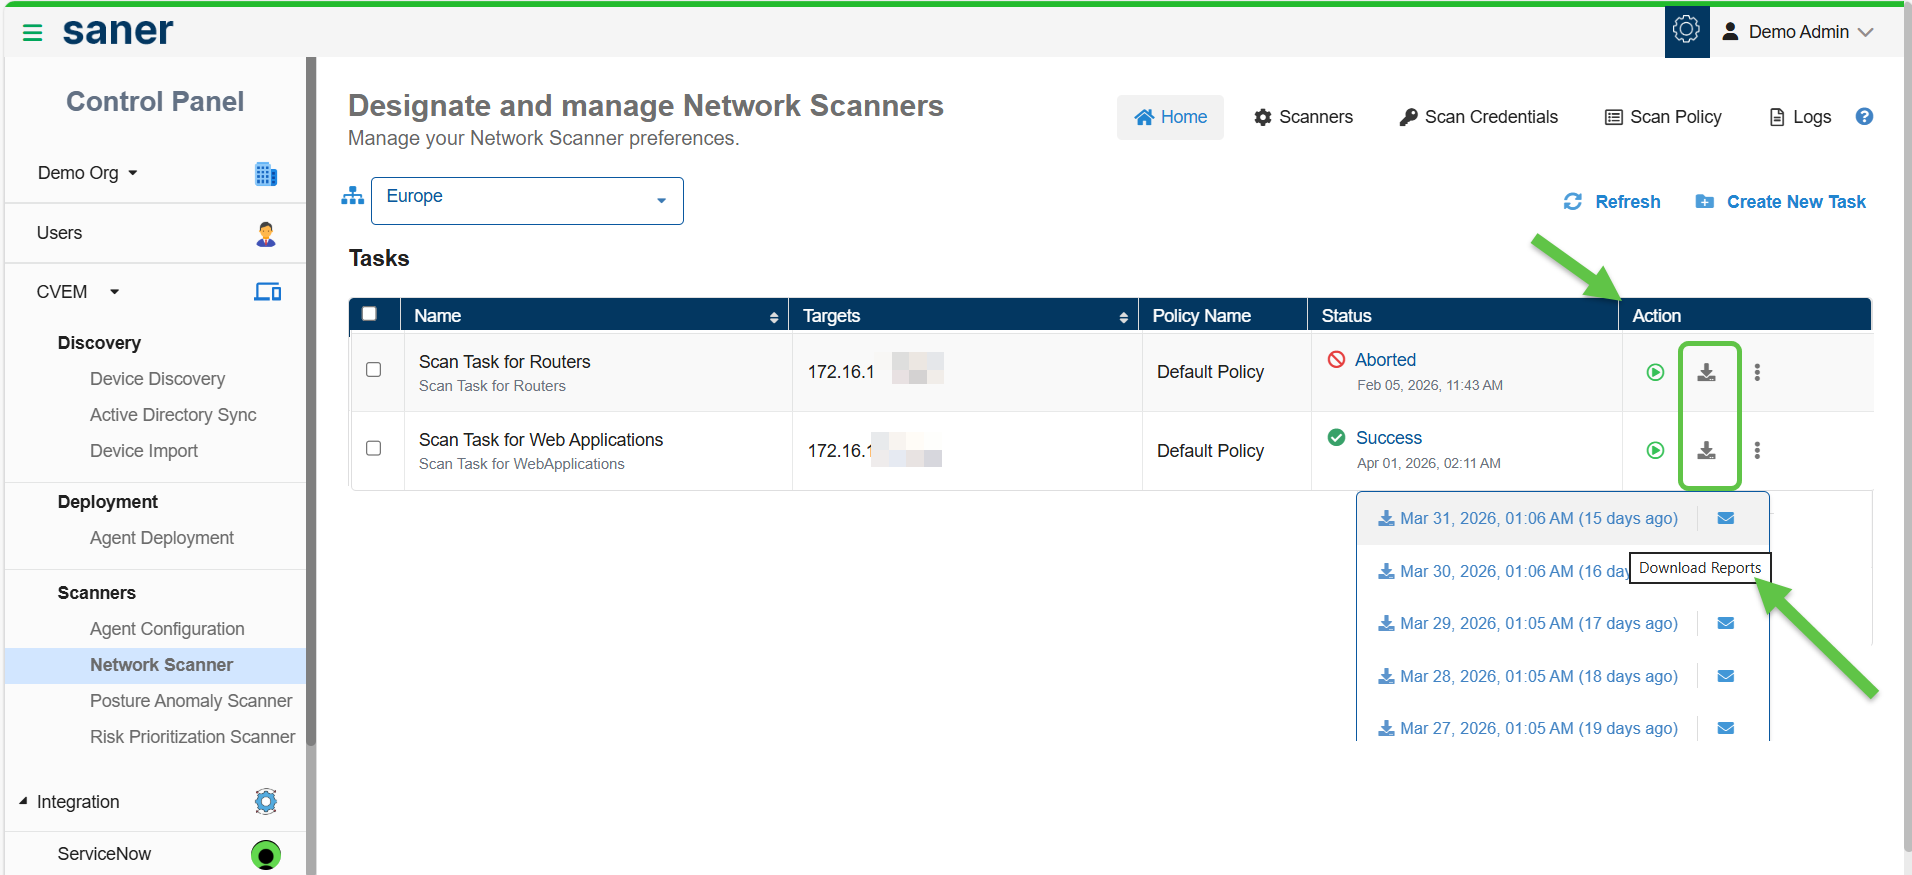
Distribute the Report Via Email
You have an option to distribute the report over email to various recipients after downloading. Just click the Email Report button and key in the email address.
Use the Logs section to track scan activities and troubleshoot issues.
Access the logs by clicking the Logs button on the top right of the Designate and Manage Network Scanners Homepage.
Using the logs:
- View all actions performed within Network Scanner
- Identify who performed an action and when
- Track scan execution and system events
Log details include:
- Job Code: Unique identifier for each activity
- Date and time
- Organization and account
- User who performed the action
- Action description
Filter logs by:
- Account: Display account-specific logs. You can specify more than one account at a time.
- User: Display user-specific logs. You can specify more than one user at a time.
- Date range: Show logs within a specified date range
Additional actions:
- Click Clear All to reset applied filters
- Adjust the number of log entries displayed per page (10, 25, 50, or 100)
The below table lists the job codes used in Saner Network Scanner and their descriptions.
| Job Code | Description |
|---|---|
| 14000 | Network Scanner Management |
| 14001 | Initiate Discovery Scan |
| 14002 | Add Discovery Scan Configuration |
| 14003 | Update Discovery Scan Configuration |
| 14004 | Delete Discovery Scan Configuration |
| 14005 | Upload Discovery Scan Data |
| 14006 | Failed to Upload Discovery Scan Data |
| 14007 | Add Network Scan Device |
| 14008 | Failed to Add Network Scan Device |
| 14009 | Updated Network Scan Device |
| 14010 | Failed to Update Network Scan Device |
| 14011 | Failed to Add Discovery Scan Configuration |
| 14012 | Failed to Update Discovery Scan Configuration |
| 14013 | Failed to Delete Discovery Scan Configuration |
| 14014 | Stop Network Scan |
| 14015 | Delete Device |
| 14016 | Failed to Delete Device |
| 14017 | Rename Network Scan Device |
| 14018 | Failed to Rename Network Scan Device |
| 14019 | Updated Device as Network Scanner |
| 14020 | Failed to Update Device as Network Scanner |
| 14021 | Removed Device as Network Scanner |
| 14022 | Failed to Remove Device as Network Scanner |
| 14023 | Initiate Network Scan |
| 14024 | Add Network Scan Configuration |
| 14025 | Failed to Add Network Scan Configuration |
| 14026 | Update Network Scan Configuration |
| 14027 | Failed to Update Network Scan Configuration |
| 14028 | Delete Network Scan Configuration |
| 14029 | Failed to Delete Network Scan Configuration |
| 14030 | Add Network Scan Policy |
| 14031 | Failed to Add Network Scan Policy |
| 14032 | Update Network Scan Policy |
| 14033 | Failed to Update Network Scan Policy |
| 14034 | Delete Network Scan Policy |
| 14035 | Failed to Delete Network Scan Policy |
| 14042 | Stop Discovery Scan |
| 14043 | Imported Network Scan Policy |
| 14044 | Failed to Import Network Scan Policy |
| 14045 | Assign Scan Configuration |
| 14046 | Failed to Assign Scan Configuration |
| 14047 | Discovery Scan Failed |
| 14048 | Network Scan Failed |
| 14049 | Unassign Scan Configuration |
| 14050 | Failed to Unassign Scan Configuration |